PiVR has been developed by David Tadres and Matthieu Louis (Louis Lab).
3. Step-by-step experimental guide
Read this guide if you:
Just want to run an experiment
Do not (yet) want to go too much into the details of how the tracking algorithm works.
Below are the essential steps to run an experiment which are further elaborated on below:
Turn the PiVR camera on by pressing ‘Cam On’.
Optimize camera height for desired field of view. Typically, this adjustment is only done at the beginning of a series of experiments.
Focus the camera by turning the lens to get sharpest image possible.
Set desired resolution in ‘Options->Optimize Image->Camera Resolution’. Please see here for a discussion of the limitations when using high resolutions.
Set desired framerate in ‘Options->Optimize Image->Recording framerate’.
Set the backlight intensity to 400,000 in ‘Options->Optimize Image->Backlight Intensity’.
Turn autoexposure off by pressing on ‘Options->Optimize Image->autoexp. on’.
Enabling the autoexposure can result in conditions where the larva cannot be found by the tracker. Disabling this function ensures consistency across trials.
Increase the backlight intensity a bit to increase contrast. Usually going to 500,000 or 600,000 is sufficient.
Define camera distance to the object by selecting ‘Options->Define Pixel/mm’. This calibration step is essential for successful tracking as it converts pixels into physical distance. This only needs to be adjusted after (1) changing the camera height or (2) change of resolution.
If you want to just track an animal select the Tracking menu in ‘Recording->Tracking’. If you want to present a virtual arena select the VR Arena menu in ‘Recording->VR Arena’.
Define folder to save data.
Optional: Enter genotype or experimental condition in ‘Exp. Group’. This tag is added to the saved data.
Select Animal Detection Mode in ‘Options->Animal Detection Method’.
Ensure that the correct animal is selected in ‘Options->Select Organisms’.
Make sure time is set to desired value.
3.1. Single animal tracking
Press here to learn how to select the Single Animal tracking menu. Use this option to track single animals. It is possible to provide a time-dependent stimulation. See here to learn how to present a single animal with a virtual reality.
Important
Several options will open a pop-up. You must close the pop-up in order to interact with the main window.
3.1.1. Select Organism
For proper identification and tracking you first have to define which organism you are using. See here to learn how to select your organism.
Important
If you are using an animal that is not in the List of Organisms, please see here.
3.1.2. Define pixel per mm
As you can put the camera at a variety of distances to the arena it is essential to define the pixel per mm ratio. Please see here to learn how to do that.
3.1.3. Setting up the arena and the camera
It is important to understand how PiVR is able to detect and track an animal in order to master this method.
The tracking software can only track what is in the field of view of the camera. If your animal can leave the field of view of the camera, tracking will stop and you will see an error.

The animal can run outside of the Field of View (FOV) during the experiment as the petri dish is not entirely visible using the camera. Adjust the dish that constrains animal movement to be in the FOV of the camera.
The algorithm works best if the background has as little contrast as possible
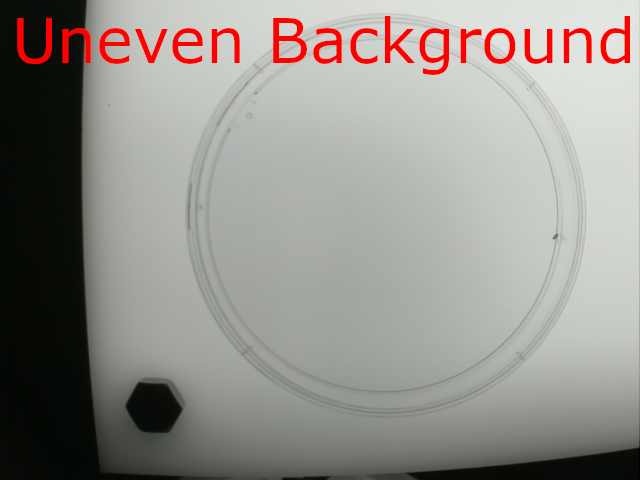
The background is very uneven as the screw of the arena is visible (bottom left) and large portions of the image are just black while others are white. Adjust the camera and/or the arena so that the image only consists of the white background illumination (and the animal).
The algorithm works best if the animal has a high contrast relative to the rest of the structure in the image.
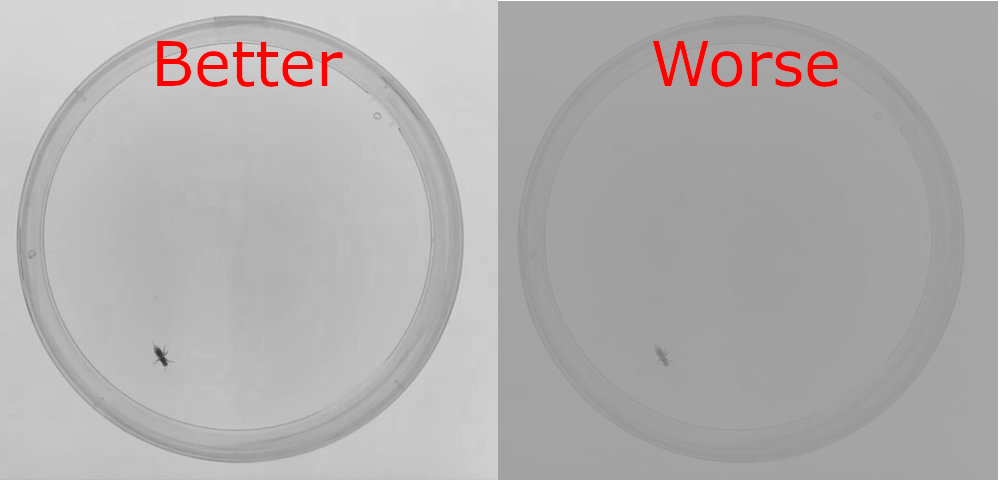
Left: The fly can clearly be seen relative to the background. Right: The fly can be seen, but does not have a lot of contrast relative to the background. Try to improve the image so that it looks more like the one on the left.
To set up PiVR to get an image as shown on the left, please follow these Instructions.
3.1.4. Animal detection
The animal needs to be detected before the actual data collection starts. It is also necessary to save a Background image for later use. Ideally this Background image does not contain the animal that should be tracked.
There are three different animal detection modes (press here to see how to select them), each with it’s own advantages and drawbacks. See here for a an illustration of the different methods.
Standard - Mode#1: This mode will allow you to track a wide variety of animals without a lot of optimization of the camera or image.
We have used this mode to track adult flies
Advantages:
Should work with pretty much any organism if it has been defined before.
Straightforward to run: Place animal, press start tracking, done
Disadvantages:
The Background image will have a partially visible animal.
You can’t align any virtual reality arenas relative to the inital movement direction of the animal.
See details here
Pre-define Background - Mode#2: If you need to define a cleaner background image, this mode can be useful. You take an image before the animal is placed, then add only the animal.
We have used this mode to track zebrafish larvae
Advantages:
Can track any animal (probably better than Mode#1) if it has been defined before.
Will give a clean background image
Disadvantages:
As with Mode#1 you can’t align any virtual reality arenas relative to the inital movement direction of the animal.
Extremely sensitive: If you have to move anything (such as holding up a lid of a petri dish where the animal is supposed to behave) this Mode probably won’t work well.
See details here
Reconstruct Background by Stitching - Mode#3: Should produce the same clean background image as Mode#2. Only works if animal clearly stands out (has high contrast) in its local environement.
We have used this mode with fruit fly larvae.
Advantages:
Allows the usage of aligned virtual reality arenas as the initial movement direction of the animal is detected.
Will give a clean background image.
Disadvantages:
High contrast requirement hard to fullfill, therefore this mode does not work well with fast moving animals. Both because animals move quickly to the edge and because the area that must be taken into account by the detection algorithm increases with the speed of the animal.
Can be difficult to use.
See details here.
To Summarize
If you choose Mode 1 or Mode 3:
Place the animal in the arena, taking the guide above into account.
Press ‘Start Tracking’
If you choose Mode 2:
Prepare the arena without the animal, taking the guide above into account.
Press ‘Start Tracking’
Place the animal into the arena.
Press ‘Ok’.
3.1.5. Animal tracking
After successful detection, the tracking algorithm starts following the animal automatically without the user having to do anything.
While tracking is in progress, the preview window will overlay most of the monitor and the GUI is not responsive.
There is no status bar available that could be shown during the tracking.
It is also not possible to cancel the experiment using a button.
3.1.6. After Animal Tracking
Once tracking is finished (either because the animal was tracked for the defined time or due to an error), the preview window will become much smaller again.
After saving all the data (which can take a couple of seconds) the GUI becomes responsive again.
3.2. Single animal Tracking with Virtual Reality
Press here to learn how to select the VR Arena option.
Besides selecting a virtual arena (as described in the link) everything is identical to Single Animal Tracking.
3.3. Taking full frame images
Press here to learn how to select the single image recording option.
This option is useful if you have several animals that you want to record simultaneously at a low frame rate. It is possible to provide a time-dependent stimulation. Compared to the video option the resulting images are uncompressed. The disadvantage is the lower frame rate and the additional hard drive space necessary to save all the images.
Place your arena with the animals you would like to observe into the field of view of the camera.
Use this guide to get the optimal image for your experiment.
Press ‘Start Recording Images’
Important
This option uses a lot of hard drive space. Make sure there is enough space left on your SD card before doing such an experiment.
3.4. Recording a video
Press here to learn how to select the Video Recording option.
This option is useful if you have several animals that you want to record simultaneously at a high (determined by your resolution, but at 640x480 you should be able to sustain >80 fps) frame rates. It is possible to provide a time-dependent stimulation. Compared to the full frame option the video will allow for much higher frame rates while using a fraction of hard drive space. Videos are encoded in the h264 format. They can be converted into any other format using ffmpeg.
Place your arena with the animals you would like to observe into the field of view of the camera.
Use this guide to get the optimal image for your experiment.
Press ‘Start Video Recording’